Simplify Project Management with Bidlight
Introduction
The Bidlight plugin extends Revit’s functionality by offering efficient tools to tag and manage projects within your model elements. This guide outlines the detailed steps for utilizing Bidlight to track and manage project data in Revit.
Getting Started
To begin using Bidlight, launch Revit and navigate to the “Bidlight” tab in the ribbon. From there, click on "Manage Projects" which will open Bidlight’s project management interface. This interface provides access to the plugin’s various features, allowing you to manage your projects with ease.
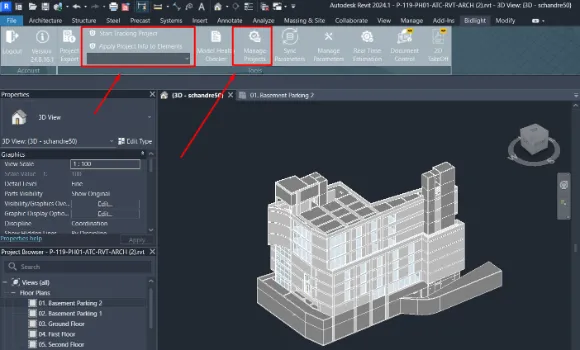
1. Starting Project Tracking
When drafting new elements in Revit, you can tag them immediately with a specific project using Bidlight’s tracking feature. Open Revit and go to the Bidlight Ribbon, where you will find the "Start Tracking Project" option. Once you click on it, a drop-down menu will appear, allowing you to select the project or revision you wish to track. After selecting, any newly drafted elements in your model will automatically be tagged with this project, helping to streamline project management from the very beginning of the drafting process.
![]()
2. Applying Project Information to Model Elements
If you need to assign project information to specific elements that are already in your Revit model, Bidlight simplifies the process. In the Bidlight Ribbon, locate and click on "Apply Project Info to Elements." A drop-down menu will allow you to choose the desired project or revision, after which you will be prompted to select the elements in your model that need this project info. Once you’ve made your selections, click "Finish," and the project information will be applied to the chosen elements, effectively linking them to the correct project.
3. Highlighting Project Elements
Bidlight also allows you to easily identify and highlight elements that are associated with specific projects. To do this, open the Bidlight Project Management window and choose whether you want to manually pick individual elements or apply changes to all elements in the model. If you choose "Pick Elements," you can manually select the ones you want to highlight and click "Finish." After this, use the "Selected Projects" drop-down menu to choose the projects you wish to highlight, then select "Highlight" from the action menu and click "OK." This will make the elements tagged with the selected project visually stand out, making it easier to identify them in your model.
4. Modifying Project Information
Sometimes you may need to update the project tag associated with certain model elements. To modify this information, open the Bidlight Project Management window and choose whether to apply the changes to all elements or specific ones. After selecting the elements or projects, choose "Modify Project Info" from the action menu. A "Change To" drop-down menu will allow you to select the new project you want to assign to these elements. Once confirmed by clicking "OK," the project tags will be updated, and a confirmation message will appear when the process is complete.
5. Creating a 3D View of Project Elements
For visualizing elements associated with specific projects, Bidlight offers the ability to create a dedicated 3D view. In the Bidlight Project Management window, select the projects for which you want to generate a 3D view. Once you’ve chosen the projects, select "Create 3D View" from the action menu and click "OK" to confirm. A new 3D view will be generated, showing only the elements linked to the selected projects. This helps you isolate and visualize project-specific elements more effectively within your model.
6. Appending Additional Project Info
If elements are involved in multiple projects, Bidlight allows you to append additional project info to existing tags. In the Bidlight Project Management window, select the elements you want to append project info to. From the action menu, choose "Append Project Info" and then select the projects you wish to add. By clicking "OK," the new project data will be appended to the existing tags, enabling multiple projects to be associated with the same elements.
7. Deleting Project Information
If you need to remove a project tag from specific elements, open the Bidlight Project Management window and choose "Delete Project Info" from the action menu. From the projects drop-down menu, select the project you want to untag from the elements, then click "OK" to confirm. The selected project will be removed from the tagged elements, untagging them from the specified project.
Conclusion
Bidlight’s plugin equips Revit users with powerful tools to manage project information efficiently. From tagging and highlighting to modifying, appending, and deleting project data, Bidlight ensures that your project elements remain well-organized and easily trackable. By following these steps, you can streamline your workflow and ensure the accuracy of your project data. For additional support, consult Bidlight’s resources or reach out to customer service for further assistance.