Ricardo
Article • a must readPublished • 2 years ago.gif)
Bidlight Real Time Estimation
1. Introduction
Plug-in Name: Real Time Estimation
Description: A Revit plug-in that connects to a company’s database to provide real-time cost estimation based on user-selected templates and protocols. It dynamically updates cost estimates as the user interacts with elements in the Revit canvas.
Purpose: The plug-in helps users assign elements to catalogs, manage unit prices, and see detailed cost estimations in real time, ultimately enhancing project budgeting and cost management.
2. Features Overview
Database Connection: Each company has a unique database containing templates, protocols, country settings, unit systems, and currency symbols.
Template Selection: Users can choose a template from the database to start the estimation process.
Real-Time Cost Estimation: The plug-in updates cost estimates dynamically as users create, delete, or modify elements.
Catalog Assignment: 1- Po-pup window for catalog assignment if an element is not assigned.
2- Options to choose catalogs from multiple databases (company, Bidlight, OneBuild, Craftsman).
3- Ability to change unit and unit price for company-specific catalogs.
Caching System: Element types that are assigned during a session are cached to prevent repeated pop-up windows.
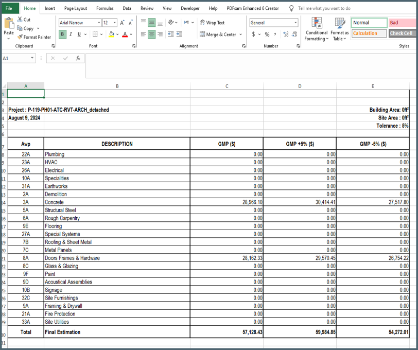
Cost Summary: 1- Displays total project cost.
2- Breaks down costs by category and element type.
Editing Features: Users can edit catalog assignments, units, and unit costs.
Data Persistence: Assignments and settings can be saved to the database for future sessions.
Excel Export: The plug-in provides an option to export the cost estimation data to an Excel sheet.
3. Detailed Feature Descriptions
Template Management: Explain how templates are selected and how they influence the estimation process.
Real-Time Updates: Describe how the plug-in tracks changes in the Revit canvas and updates costs accordingly.
Catalog Management: 1- Describe the sources of catalogs (databases) and the process of assigning element types.
2- Include details on how units and unit prices are managed and customized.
Caching System: Explain the caching mechanism and its role in improving the user experience.
Cost Breakdown: Provide details on how the plug-in calculates and displays costs at different levels.
Editing and Customization: Elaborate on the user's ability to modify catalog assignments and cost parameters.
Data Persistence: Describe how user data is saved and retrieved in subsequent sessions.
Excel Export: Explain the export process and what information is included in the Excel sheet.
4. User Workflow
Step-by-step guide on how a user would typically use the plug-in, from logging in to exporting the estimation.
5. Conclusion
Summarize the benefits of the plug-in and how it improves the cost estimation process for users.
Template Management:
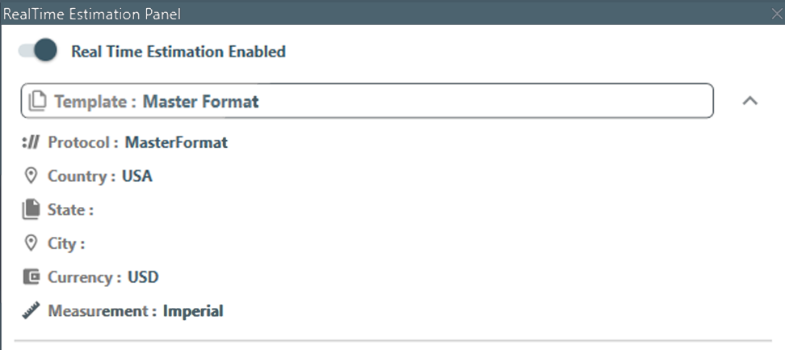
1. Enable Real Time Estimation (RTE)
First, we need to enable the RTE

2. Select The Template
Then it will pop-up window to select the template from the company database (you can use search text box)


3. RTE Enabled!
After selecting the template and press “OK” button it will be loading to get all the information from the database (like (catalogs, saved mapping elements, all template information)
Catalog Assignment:
1. Start Assign Element Type to Catalog
Now if we (select or create) element in our canvas and it is not mapped in the database or our plug-in case
the catalogs window will pop-up to assign your element type.
2. Catalogs Pop-up
Then the catalog window will pop-up so we can select catalog for this element type to assign it to unit and unit cost of the selected division.
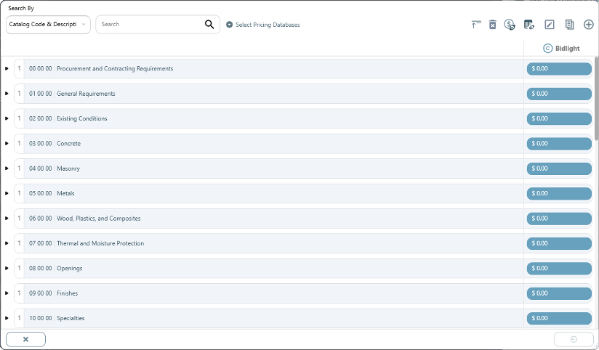
Catalogs Pop-up Components:
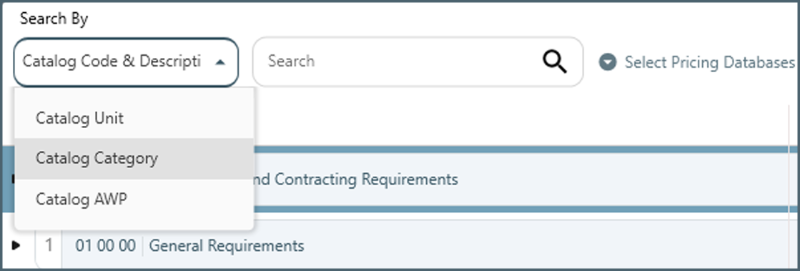
1. Search Area
We can search for the divisions according to multi options like (description, unit, category , AWP)
2. Databases Check
We can select from multiple databases like (Bidlight , oneBuild , Craftsman) and more that will be added!
to see all units and unit prices for different databases.

3. Buttons Area
We have multiple buttons to control the divisions like (Add , Copy , Delete , Show Priced / Unpriced , Edit , Collapse).

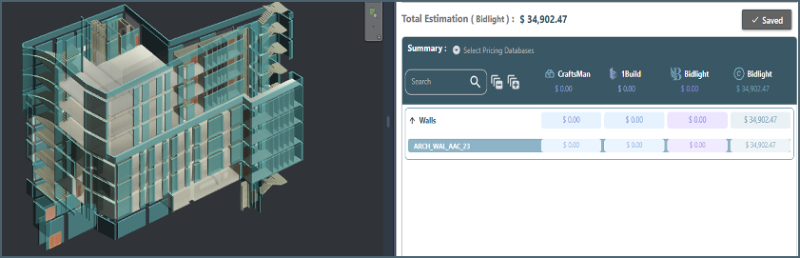
Cost Summary:
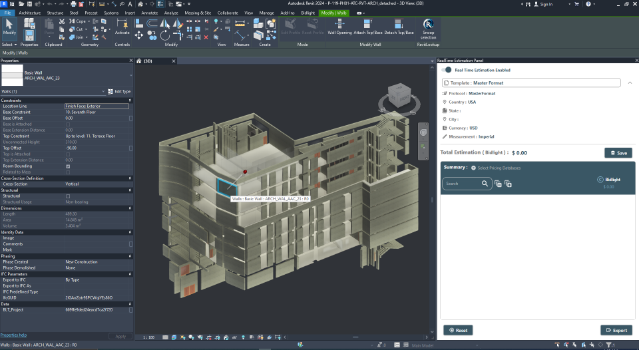
1. Dock-panel
Now after assigning the element type to selected division the cost will be updated automatically for each category and each element type, and we can see the total cost of priced categories in the whole document.
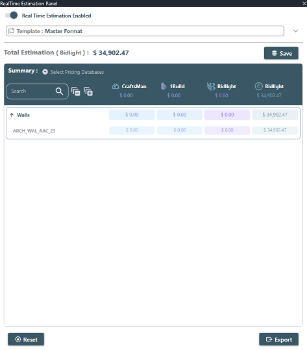
2. Saving To the Company Database
Then after assigning all the element types in the whole document, we can click on the save button to directly save to the company database (Note: if we saved the Revit document it will pop-up to ask for saving on the database or not)


Summary Components:
1. Summary Header
We have in summary header in the left side “Total Estimation Cost” for Total company prices and with the template currency and in the right side “Save” button which make us to save the prices and elements mapping. (Note: “Save Button” can notify us if we need to save, or it is last updated with the database)
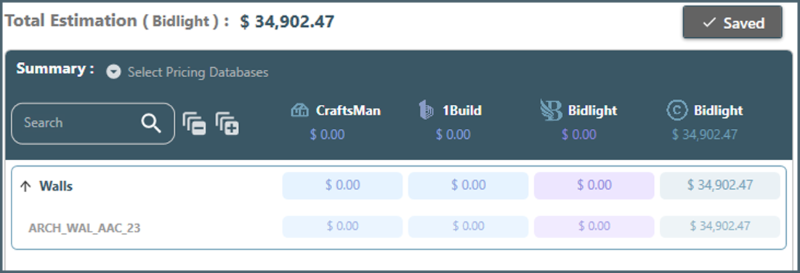
2. Summary Controls
We have in this part the options of selecting multi databases to show their prices like “Catalogs Pop-up”,
and we have search area so we can filter by the name of priced element types and two buttons to collapse and expand all our priced categories.
3. Summary Body
In summary body we have expanders for each category which contains priced element types,
here we can click on any priced element type, and it will select direct in our canvas and we can press CLR for multi selecting.
Selected Element & Reset:
1. Selected Element Area
If we select any element in our canvas if it’s found in our cache or database it will not pop-up the catalogs window, it will show the selected element properties and the assigned division properties like (unit , unit cost) and the total cost of that element type, we can also click on the button of edit the division so we can reassign that element to another division.
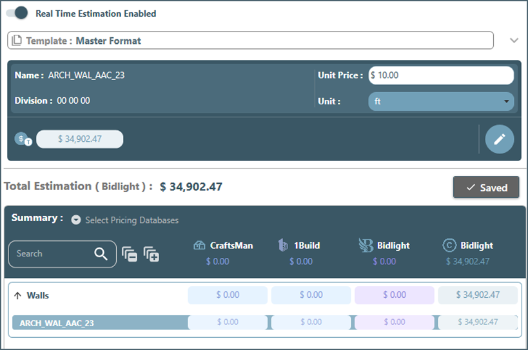
2. Reset Button
We have in the below left side of our dock-panel button to reset our session so we can choose another template again and work with different protocol, if we pressed this button it will pop-up window to ask us for saving our assignments in the company database or not , then we can re-enable the RTE again and if we choose the same protocol we will find our saved data for the previous sessions.![]()

Export Estimations:
1. Export Button
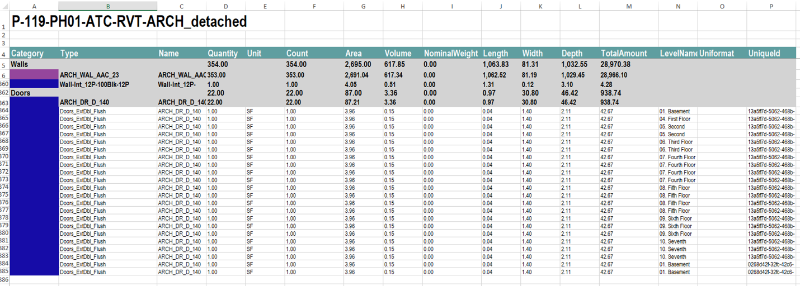
Now finishing our estimation, we can click on the export button to export the estimation, it will generate 3 excel sheets:
A- Estimation
B- Estimation
C- Excel Quant